 How to record and save sound from microphone into .wav
Recording audio content on your Windows PC was and still is possible without installing third-party applications on your computer. However, the list of supported output formats is quite limited, no matter which operating system version you're using, as the built-in sound recorder allows you to export your audio files to only one format. Before Windows Vista, all of your audio recordings were saved as WAV files. Afterwards, the next operating system versions allowed you to export your recordings to WMA format. Now, Windows 10's sound recorder enables you to save your audio files to the M4A format. Out of all of the aforementioned audio formats, WAV is the most popular one and works with a wide range of audio editors and players.
The article will prove to be of good use to people who record audiobooks, interviews or audio commentaries on their Windows 10 PCs and wish to export the resulted sound files as WAV.
Windows 10's Voice Recorder supports only one format: M4A. In this guide I will show you how to use ocenaudio and Audacity, 2 third-party programs for recording and saving audio content on your PC that support WAV as output format and provide you with a wide range of useful features. You're probably asking yourself why I didn't recommend you to use a third-party audio converter for exporting recordings to WAV format. In my opinion, it's a better idea to use a different audio recorder instead of using a converter as there's a smaller risk of losing the quality of your recordings while converting the sound files.
Tutorial Assets
You will need to download and install one of the following applications in order to keep up with this guide.
Download ocenaudio
Download Audacity
ocenaudio
ocenaudio is a sound editing utility that is available for most operating systems (Windows, Linux, Mac, etc.). With its help, you can split or trim audio files, apply various sound effects to your songs, extract segments from your audiobooks, and so much more. The program also enables you to record audio content from your microphone and save the captured sounds to multiple formats. Here's what you need to do in order to record and save sound from the microphone into WAV:
Step 1
Launch the ocenaudio application on your computer.
Step 2
Select the preferred audio recording options.
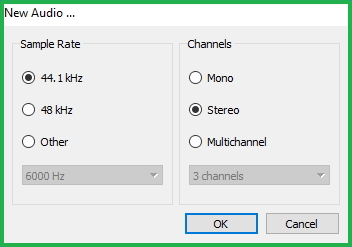 Configuring Recording Settings In ocenaudio
Step 3
Click on the red circle to begin your audio recording.
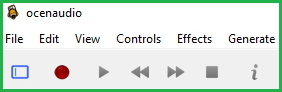 Begining Recording In ocenaudio
Step 4
Stop the recording. Press the File button from the main menu of the program and select the "Export" option.
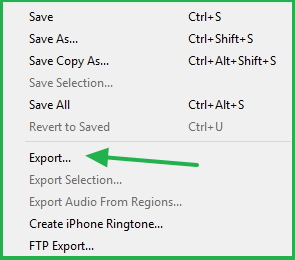 Exporting Audio Recording In ocenaudio
Step 5
Choose the WAV format, enter a name for your audio recording, and click the "OK" button.
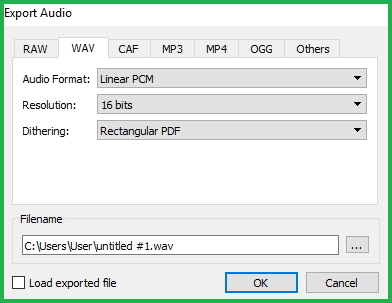 Saving Recording As WAV In ocenaudio
Audacity
Audacity is an open source tool that provides you with almost any feature required while recording or editing audio content on your computer. It's packed with a wide range of useful editing options, lets you choose from multiple output formats, and gives you access to quality audio files in no time. The program's interface might seem a bit overwhelming to beginning computer users. To make it more user-friendly go to the View menu of the application and customize the appearance of the main window by removing the buttons or panels you don't require.
Here are the steps you need to complete in order to record and save sound from the microphone into WAV:
Step 1
Launch the Audacity application on your PC. Click the red circle button from the main toolbar of the app to begin the recording process (you can always pause and resume recording if needed). Stop the recording process.
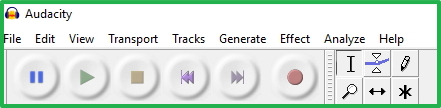 Audacity Main Toolbar
Step 2
Go to the File menu and click the "Export Audio" button.
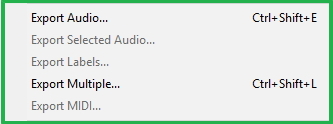 Exporting Recording In Audacity
Step 3
Select the destination folder for the recording file, choose the WAV output profile, and click the "Save" button.
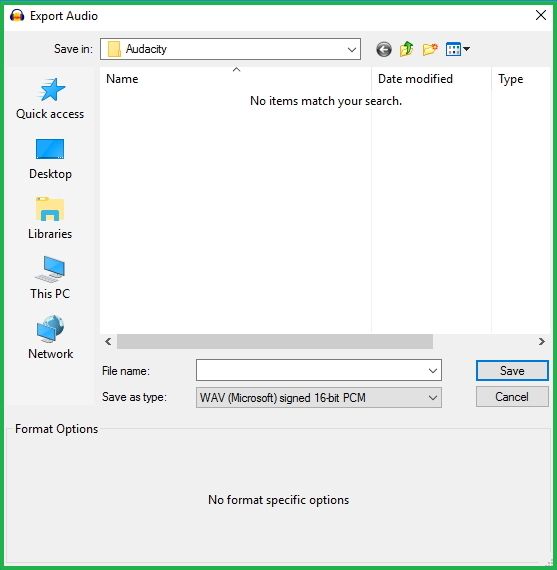 Configuring Output Settings In Audacity
Conclusion
Using any of these two audio recording tools is very simple even for a novice computer user or someone who has little experience in audio editing. Personally, I prefer working with ocenaudio as it comes with a more intuitive interface and doesn't display a wide range of buttons or panels. Still, both programs provide you with quality WAV files, feature easy-to-configure output settings, and are free of charge. It's up to you to decide which application is the best for recording and saving sound from your microphone into WAV files.
Alternative downloads
-
 ACA Audio Recorder
$29.95
windows
Direct and real-time sound recorder software which offers professional recording features with WAV...
Download
ACA Audio Recorder
$29.95
windows
Direct and real-time sound recorder software which offers professional recording features with WAV...
Download
-
WavePad Sound Editor
$60
windows
Professional audio and music editor for Windows.
Download
-
ocenaudio
free
windows
Simple tool for editing and analyzing audio files.
Download


Comments