 How to show and hide files on Mac OS X
Hiding files and folders on your computer might be a good way to ensure your personal data and information stays away from wandering eyes, thus protecting your privacy. Fortunately, Mac OS X provides you with a way to hide your files from sight, just like Windows and Linux do. However, the process is not as simple as it is with the mentioned operating systems, and this guide will help you understand the required steps to hide your folders and data.
Using the Terminal
The first thing you will need to do in order to start hiding your files and folders, is launch the Terminal (Go -> Utilities -> Terminal). Once you have done that, you will have to type several UNIX commands and perform some actions which I will describe below.
Display hidden files in Mac OS X
Before you start hiding your files and folders, you might want to know how to make them visible again. Mac OS X offers you two ways to do that: either by using the Terminal and writing two commands or by using the Open/Save dialogue.
During Open/Save dialogue
The Open and Save dialogues provide you with a very simple waw to make your hidden files visible. All you have to do is press the Command+Shift+Period (the dot - "." key) key combination when the Open and Save dialogue is opened. After this, all the hidden files and folders should appear, giving you the option to instantly access them. If you want to make your files and folders hidden again, then simply press the same key combination, and your data will disappear from sight. Depending on your version of Mac OS X, you might be required to click on a different folder after using the Command+Shift+Period combination and then click back again on your folder.
 Hidden files in Open/Save dialogue
Using the Terminal to make files visible in Finder
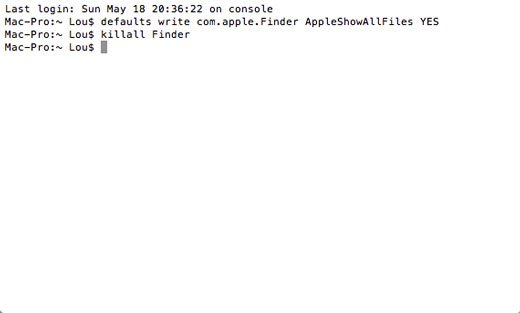
If you want to make your folders and data visible at all times, not just when using the Open/Save dialogues, then you will have to launch the Terminal and input two commands (press the Enter key after each command)
defaults write com.apple.finder AppleShowAllFiles TRUE
and
killall Finder
After these commands, any opened window will be refreshed, and all of your hidden files and folders will become visible and slightly transparent, so you can easily differ them from visible folders.
 Terminal Command
The commands for making your files and folders hidden again are similar to the previous ones, and all you need to change is the "TRUE" attribute from the first command to "FALSE", like this:
defaults write com.apple.finder AppleShowAllFiles FALSE
and
killall Finder
Hide and unhide files and folders
Now that you know how to display hidden files and folders on your Mac, it is time to learn how to make them hidden or "unhidden". To do that, you will have to open the Terminal and type the command below. Make sure you add a space after the last symbol of the command.
chflags hidden
Once you have written the command (with the space included), go to the file or folder you want to hide and simply drag-and-drop it onto the Terminal's window to get its path. You can also manually input the path, but the first method is much easier. Now, all you need to do is press the "Enter" key, and you will have your file or folder hidden from sight.
If you don't know how to access your hidden folder or file, simply use the "Go to Folder" option under the "Go" menu in Finder and type the path of your hidden item. For example, if you have a folder named "HiddenFolder" on your Desktop, simply input "~Desktop/HiddenFolder" and press "Enter" to access it (even if it is hidden). Easy, right?
OK, now that you know how to hide a file or a folder from sight, you might want to know how to unhide it. Well, the process is similar to the one used for hiding files, but, instead of the previous command, you will have to write the following, followed by a space:
chflags nohidden
Now, simply type the path of your hidden folder or file if you remember it or, if you don't, then use the above mentioned method and drag-and-drop your hidden folder/file onto the Terminal's window. Press "Enter" and your file or folder will become visible once again.
Use keyboard shortcut to hide and unhide files
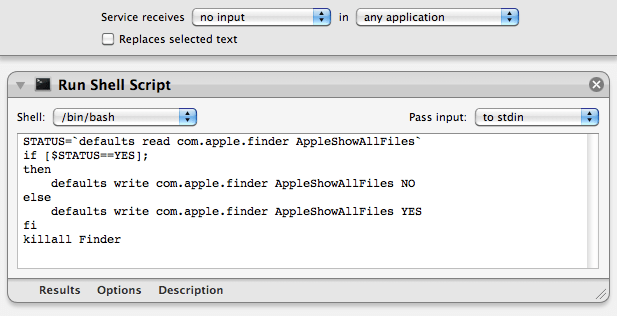
Additionally, you can create a keyboard shortcut that will let you hide and unhide your files and folders, but this method might be a bit tricky for some users, as you will have to create a Shell script.
First of all, you will have to open "Automator" (which can be found in the Applications folder) and select a Service template. Once you have done that, go to the library, select "Run Shell Script" and drag it to your workflow area. Now it is time to write the following commands:
STATUS=`defaults read com.apple.finder AppleShowAllFiles`
if [ $STATUS == YES ];
then defaults write com.apple.finder AppleShowAllFiles NO
else
defaults write com.apple.finder AppleShowAllFiles YES
fi
killall Finder
If you are using Mac OS X Mavericks, then the command list is slightly different:
STATUS=`defaults read com.apple.finder AppleShowAllFiles`if [ $STATUS == 1 ]; then defaults write com.apple.finder AppleShowAllFiles -boolean false else defaults write com.apple.finder AppleShowAllFiles -boolean truefikillall Finder
 Automator Script
Now, all you have to do is select the "no input" option from the "Service Receives" drop-down menu and save it using a meaningful name, something like "Toggle Hidden Files". Once you have done that, you will be able to hide your files and folders using the "Toggle Hidden Files" option by accessing the Services menu in Finder. If you want to add a keyboard shortcut to it, then go to "System Preferences", click on the Keyboard shortcuts tab, select "Services", find the "Toggle Hidden Files" service and double-click it to assign a hotkey.
Conclusion
As you can see, displaying and hiding files on Mac OS X is not so difficult, even if it might seem a bit more tricky than it is in other operating systems like Windows or Linux. If, by any chance, this still seems too much to handle, then you can use third-party applications like Hider 2, Secret Folder or Invisiblix to manage your hidden files and folders. If you have any additional questions, feel free to use the comment section below.
Alternative downloads
-
 Hider 2
free
mac
App that lets you hide, encrypt, and password protect private data on your Mac.
Download
Hider 2
free
mac
App that lets you hide, encrypt, and password protect private data on your Mac.
Download
-
Secret Folder
$29.95
mac
Very useful to keep your information away from prying eyes, it conceals folders and files on your Mac with a click...
Download
-
invisibliX
free
mac
Little Cocoa utility application to manage hidden items in the Finder.
Download


Comments