 How to configure Cortana in Windows 10
If you are familiar with Windows Phone mobile devices, then you might have already met Cortana, the digital voice assistant. You might also know her from the popular video game series, Halo, where she is portrayed as an AI entityand one of the main non-playable characters in the game series. After the launch of Windows 10, Cortana became much more than a simple search feature that can help you find content, as she (yes, I am referring to Cortana as "she" instead of "it", due to her "personality") is capable of learning your interests and hobbies, help you set reminders and much more.
Even if configuring Cortana can prove to be quite a hassle for some users, I will show you how easy it is to do that in the guide below.
Initial settings
Fist of all, to access Cortana, all you have to do is click on the search bar, next use the Start button on the taskbar (the one where it displays "Ask me anything"). You can even choose to hide the search-box with a simple right click and only opt display a search icon instead (as you can see in the image below).
When accessing Cortana for the first time, you will be asked to provide some information and choose some of the settings that will help with personalizing your search results. First, Cortana will ask you for your name, which she will use when answering to your search queries or prompting notifications.
Name Request
Once the name has been provided, Cortana will ask you if you want to let her use the localization data. This is where some users get are a bit concerned regarding their privacy. Luckily, you can choose to disable this feature for privacy-related reasons, but if you want to receive personalized results (like searching for the closest pubs and restaurants), you will have to enable it.
Accessing Cortana's settings menu
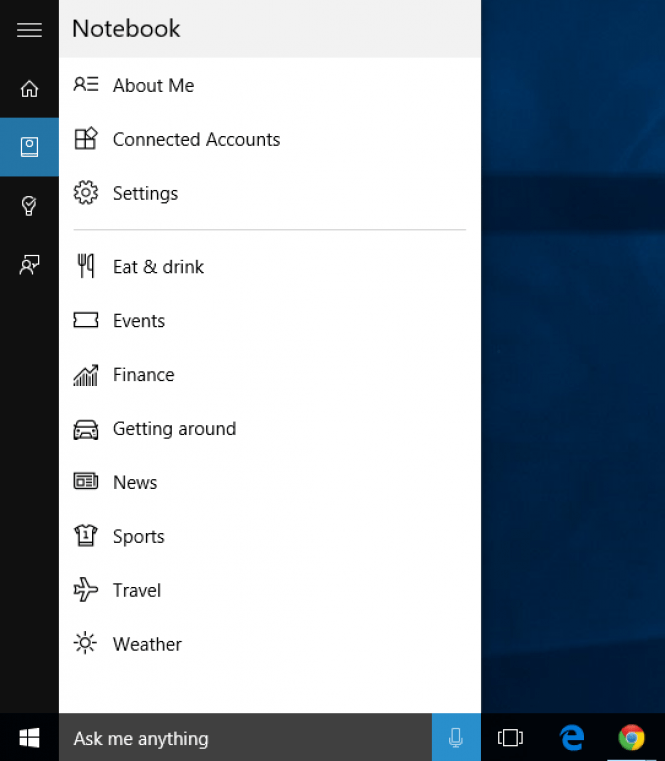
Now that you have provided Cortana with your basic information, it's time to access the "advanced" settings menu. To do that, you can either write type "Cortana settings" in the search bar or access the Notebook (after launching Cortana, click on the second icon on the left).
 Notebook
As you can see from the image above, the Notebook is divided into two sections: one that will let you change your personal information and another one that determines what information Cortana can access, display and offer to you.
For now, let's talk a bit about the first section.
- About Me - From here, you will be able to change the name by which you want Cortana to call you and also add, edit and remove favorite locations (such as home, work, park and so on). These are pretty intuitive, and there is no point in insisting on them.
- Connected Accounts - This section will let you manage the accounts to which Cortana can connect, like your Microsoft Live or Office accounts.
- Settings - This area provides you with various options that you can change in order to modify how Cortana works. Here, you can access the information Cortana has learned about you and customize the way she will provide you with information to your questions and queries. Most importantly, in this section you will be able to enable or disable Cortana's voice activation. You can either make her respond to anyone saying the phrase "Hey Cortana", or you can choose to make her respond only to your voice (you will have to say 6 phrases in order to calibrate her to your voice).
Once you have finished modifying these settings, you can go on and customize the way you will get results for your questions and queries, based on various topics of interest. All you have to do is click on the desired category (also known as cards) and decide from where you want Cortana to get the information, and what you want to be displayed. For example, you can click on the "Eat & drink" card and have Cortana search for restaurants with a specific atmosphere or make her track the results and news about your favorite sports team by accessing the "Sports" sub-setting.
Sports Section
Other features
Reminders
Another great feature that Cortana comes with is the way she can help you set up reminders. Not only can you set up reminders for any desired task that will be launched at any desired time, but Cortana will also help you set up reminders that will activate when you make relevant searches, contacting a specific person from your contacts list or arriving to a determined place (as shown in the image below - buy milk when I get to Tesco).
Reminders
Feedback
Since Cortana is a new service on personal computers, it comes with a feedback section. Here, you can tell Microsoft what you like and dislike about Cortana in order to improve her, or you can even submit your own ideas about what would you like to see in the future.
Feedback
Conclusion
As you can see, you can easily customize Cortana to fit your needs. Even if you might encounter some glitches, remember that the service is still quite new on desktop computers and using the "Feedback" section will help Microsoft greatly improve her.


Comments
Subscribe to comments