 How to set up OBS Studio
OBS Studio is an open source program that's compatible with Windows, Mac, and Linux machines, and that gives you the ability to record and live stream video and audio content from the comfort of your home. But before starting a video recording or audio streaming, you need to configure several settings. This guide will teach you how to set up OBS Studio so that you can get the exact quality results you require.
Here's what you need to do:
1. Launch OBS Studio on your Windows PC.
2. Click the "Settings" button.
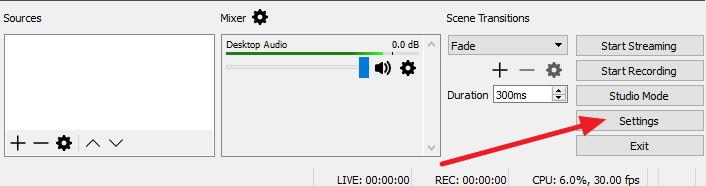 Access Settings Panel
3. Choose the preferred streaming service and fill the Stream Key field from the Stream panel. You can skip this step if you are only going to record video or audio content.
4. Head to the Video screen from the Settings panel. Choose the preferred base and output resolutions, downscale filter, and FPS value. It is best if you let the default Base (Canvas) Resolution unaltered as it's set to your primary monitor's resolution.

5. Go to the Output window. For streaming content with the aforementioned video settings (720p with 30FPS) it's best you choose the 2500 video bitrate value. If your Internet service cannot handle this bitrate value, you can downscale the resolution. To get quality results when recording content, you need to choose the "Indistinguishable Quality, Large File Size" option (next to the Recording Quality option).
6. Select the preferred Scenes and Sources. You can create as many Scenes profiles as you like. For example, if you record and stream a game walkthrough, you can create the following scenes: Welcome, Customizing Profile, Match, and Conclusion. The app lets you sort them in any order you like and remove the ones you no longer need. You can choose from many Sources profiles: Audio Input Capture, Browser Source, Display Capture, Game Capture, Window Capture, etc.
7. Click the "Start Streaming" or "Start Recording" button to begin your task. That's it.
Conclusion
Configuring the aforementioned settings seems an easy task. However, you need to consider your hardware specifications as well as the strength of your Internet connection signal when setting up the program. Recording and streaming at the same time might require extra CPU usage and slow down the performance of your system if your hardware specs are low. If that's not the case, set up OBS Studio using this guide, and you can start streaming content on the Web.
Alternative downloads
-
 GOM Studio
free
windows
Broadcast real-time video stream to supported websites such as Facebook...
Download
GOM Studio
free
windows
Broadcast real-time video stream to supported websites such as Facebook...
Download
-
Overwolf
free
windows
Free app that allows developers to create extensions for video games.
Download


Comments
Subscribe to comments