 How to record PC screen
Sometimes screenshots are simply not good enough for showing a piece of information from your desktop. Recording your screen activity might capture all of the necessary details and pass them on to your viewers through quality videos. There can be numerous reasons why you would need to record your PC screen. You might need to create a video tutorial for a program you designed, record game walkthroughs or capture a video conference.
Windows provides you with a default solution for completing any of the aforementioned tasks but it's quite hidden. The built-in Xbox utility comes with an option to record game walkthroughs but can also use it to capture other types of screen activities. It exports the results to the MP4 format and the output quality is excellent. The downside is that not all of us can meet the system requirements: you would need a video card that supports the Intel Quick Sync H.260, Nvidia NVENC or AMD VCE encoders. Also, you have access to a limited amount of output settings.
There are countless solutions from various third-party developers that support more output formats, provide you with editing options, and are compatible even with low-end computers. Some free examples come from programs like Open Broadcaster Software, ShadowPlay, Loilo Game Recorder or XSplit. Some of the best shareware video recorders include Bandicam, Icecream Screen Recorder, GoPlay Editor, Adobe Captivate, and many others.
In a previous guide, I showed you how to create a Let's Play video, a recording of a user playing a video game and making a commentary or an analysis of it. In this article, I will teach you how to record your PC screen in general. I will use one of best screen recording solutions: Open Broadcaster Software. It's open source, supports live streaming, provides you with multiple editing options, and gives you access to a wide variety of recording settings to help you get the exact results you need. Here's how you can use Open Broadcaster Software to record your screen activity:
Tutorial assets
You will need to download the following software to follow along with this tutorial.
Step 1
Install the utility on your PC. A quick setup assistant will help you configure the program's settings according to your needs. You can skip this step and configure the settings later if needed. All of the program options can be found in the Settings window. You might want to select the preferred output format and destination folder before recording anything as the utility automatically exports the results once you stop the recording process.
Step 2
On the bottom of the interface, you will see a couple of panels. Add a new scene to your project in the Scene panel and select the type of recording you wish to make by choosing a profile from the Sources panel.
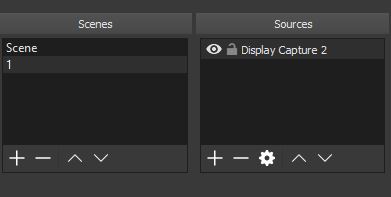 Selecting Recording Type
Step 3
Click the "Start Recording" to begin the screen capturing process. You can always pause and resume recording. Click the "Stop Recording" process once you complete your tutorial or game walkthrough. The output files can be found in the destination directory you selected from the Settings window.
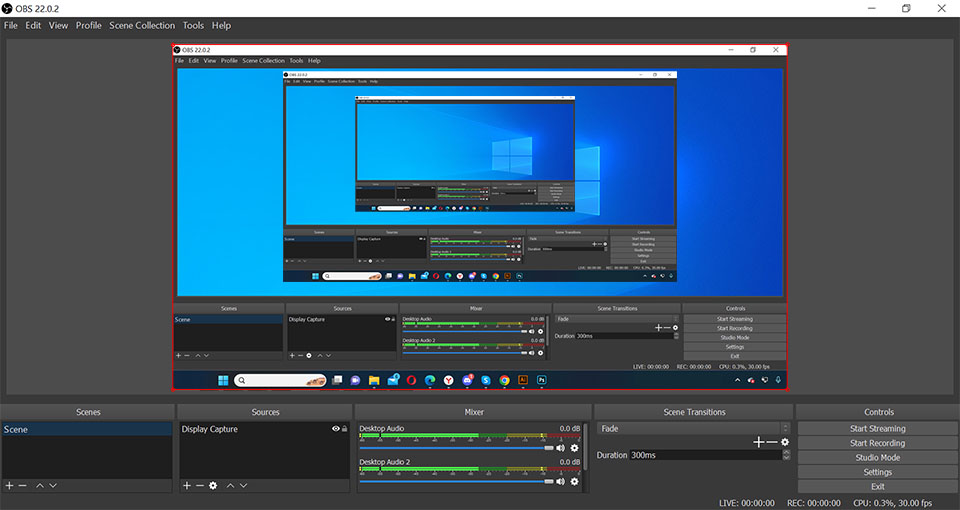 Recording Screen Activity
Optional: One of the most popular features available in Open Broadcaster Software is the ability to live stream content. You can also define a wide range of hotkeys for almost any type of task you could think of, choose between various customizable transition effects, configure the audio mixer settings according to your needs, and so much more.
Conclusion
Even though Open Broadcaster Software might seem difficult to handle at first, after you check the tutorials from its homepage and study a bit its interface, it will definitely become your go-to utility for capturing screen activity. If that's not the case for you, there's plenty of fish in the sea like I mentioned at the beginning of this guide. So, which video recorder will you choose? Let us know in the comments section below.
Alternative downloads
-
 Icecream Screen
Recorder
$79.93
windows
Effortlessly record your screen with audio using Icecream Screen Recorder.
Download
Icecream Screen
Recorder
$79.93
windows
Effortlessly record your screen with audio using Icecream Screen Recorder.
Download
-
Open Broadcaster
Software
free
windows
Free and open source software for video recording and live streaming.
Download


Comments
Subscribe to comments