
 How to record your screen on Mac with audio
Recording the screen on a Mac takes one keyboard shortcut. Recording it with sound is where most people get stuck, because "audio" can mean two different things. The first is your voice, picked up by a microphone. The second is system audio: the sound your Mac plays itself, such as a video call, a game, or a clip in the browser. For years, the built-in recorder could only capture the former. In this guide, we'll show you how to record your screen on Mac with your voice, with system audio, and with both at once, using the built-in tools or OBS Studio.
Record the screen with your voice
The built-in Screenshot app does this on any Mac running macOS Mojave 10.14 or later.
Step 1
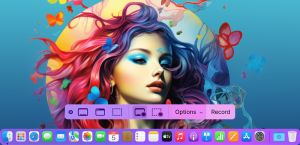
Press Shift + Command + 5. A toolbar will appear at the bottom of the screen.
Step 2
Choose what to capture: Record Entire Screen or Record Selected Portion. In macOS Tahoe 26 or later, there is also Record Selected Window. If you record a portion, drag its borders to adjust the area.
Step 3
Click Options and pick your microphone in the list. Here you can also set a timer, show mouse clicks, and choose where to save the video.
Step 4
Click Record. When you finish, click the Stop button in the menu bar or press Command + Control + Esc. By default, the recording is saved to your desktop.
You can start the same recorder from QuickTime Player as well: open it and choose File > New Screen Recording.
Record system audio with the built-in tool
Starting with macOS 27 Golden Gate, the Screenshot app can capture the sound of your Mac without any extra software.
Step 1
Check your macOS version: open the Apple menu and select About This Mac. If you see macOS 27 or later, go on. Otherwise, skip to the next section.
Step 2
Press Shift + Command + 5 and click Options.
Step 3
Choose Include System Audio. To add your voice on top, select a microphone in the same menu.
Step 4
Click Record and stop the recording the same way as before.
Record system audio with OBS Studio
On earlier versions of macOS, the built-in recorder has no option for system audio. The easiest free way around it is OBS Studio, which captures both the picture and the sound on macOS 13 Ventura or later. If you have never used the program, take a look at our guide on how to set up OBS Studio.
Step 1
Download and install OBS Studio. On the first launch, macOS will ask for permission to record the screen. You can also grant it by hand in System Settings > Privacy & Security > Screen & System Audio Recording.
Step 2
In the Sources panel at the bottom of the window, click the plus button and add macOS Screen Capture. Select your display, a single window, or one application. This source records the picture together with its sound.
Step 3
To add your voice, click the plus button again and choose Audio Input Capture, then select your microphone. Both sound sources will show up in the Audio Mixer, where you can balance their volume.
Step 4
Click Start Recording. When you're done, click Stop Recording and go to File > Show Recordings to find the video.
If you need only the sound of one program without everything else, add the macOS Audio Capture source instead. It is available in OBS Studio 30 or later.
Conclusion
Recording your Mac's screen with audio comes down to which sound you need and which macOS you run. For a voice-over, Shift + Command + 5 is enough on any modern Mac. For system audio, the same shortcut works in macOS 27 or later. On macOS 13 through 26, OBS Studio can do the job instead. Before a long recording, make a ten-second test and play it back to check that the sound is really there. What do you record most often: calls, lessons, or games? Let us know in the comments below.
Alternative downloads
-
 Aiseesoft Mac Screen
Recorder
$12.5
mac
Aiseesoft Mac Screen Recorder makes it easy to record any video or audio played on Mac.
Download
-
Debut Free Mac Screen Recorder and Video Capture...
free
mac
Debut is a free screen video recording software for mac.
Download




Comments
Subscribe to comments