 How to record your screen using Action!
For those of you that don't know, Action! is a powerful application that gives you the possibility to capture almost anything on your computer, from simple screenshots or audio recordings to gaming sessions and desktop activity. Furthermore, this utility will let you save your recordings in HD. Reading the following guide will make you have a better understanding of this tool's cool features.
Tutorial assets
You will need to download the following software to use along with this tutorial.
Recording modes
Before we start diving into Action!'s many features, you might want to learn about the basics, and what better place to start than talking about the recording modes this program has to offer?
Video recording
As you can probably guess, Action!'s primary function is helping you record videos of your screen activity, and it will let you do that in three modes, depending on your needs: "Active screen", "Games and applications" and "Active desktop region". You can easily shift between these modes with a simple mouse click on each icon from the program's interface.
Here are some brief explanations for each of these recording modes:
- "Active screen" - By selecting this option, you will be able to record everything that happens on your computer in full-screen mode. You can activate it by clicking on the computer monitor icon of the interface, as seen in the image below.
Active Screen Mode
- "Games and applications" - This mode will allow you to record your gaming sessions or your activity when using applications that run in full-screen mode and, otherwise, won't allow you to make a standard recording. This usually happens with pieces of software that use DirectX or OpenGL to render graphics. To activate this mode, click on the gaming console icon in the program's interface. It will even display the FPS and show it in your recordings.
Game/Application Recording Mode
- "Active desktop region" - This third and final recording mode gives you the possibility to define a region on your screen and record any activity that happens within it. You activate this mode by clicking on the dashed rectangle icon of the interface and defining the desired region. You can easily modify the region by selecting one of the available presets, create a new preset by adding a specific resolution, or you can click and hold any of the rectangle's corners and change the recording region dimensions as you see fit.
Active Desktop Region Mode
Now that you know how these recording modes are activated and what they can do, it's time to talk about the options and settings available for all of them.
First of all, Action! gives you the possibility to save your recordings either as AVI or MP4 video files. It might seem that it offers a very small number of available formats, but these two file types are compatible with almost any device, can be opened by most applications and be viewed on various platforms without having to install codecs or any other additional tool.
Format Selection
Second, Action! gives you the chance to choose the desired quality of your recordings by allowing you to select the "video size" from 280p to 1080p and the "frame rate" from 15 to 120 frames-per-second (FPS). Just don't forget that a higher quality and a higher frame rate of a video file will result in a recording with considerable size.
Video Size and Quality
Another nice feature that Action! puts at your disposal is the handy timer, or "Duration" as you find it on the program's interface, that will allow you to create recordings with a specific length. This can prove to be quite useful if you want to make a video tutorial that has exactly 45 minutes, for example. Simply check the "Duration" box and select the desired time in hours, minutes and seconds.
Duration Option
Other than that, there are options that you can quickly enable with just a few clicks of a mouse. You can choose to include any system sounds in your video recordings or even record your voice over a microphone. You can activate the "Perfect Video Match" mode that will help you perfectly match the frame rate of videos from media players and online streams.
One more thing that you should know about Action! is the fact that it allows you to quickly upload your recordings to Facebook or YouTube. In order to do that, you will have to select your recording from the left side of the window and click on the YouTube or Facebook button in the bottom-left area.
YouTube upload button
After clicking the button, a new window will pop up where you can select the desired video profile, quality, bit-rate and any of the available audio tracks that you might capture. Once you have chosen these parameters, click on the small "next" button, provide a title and a description to your movie, press the "Start" button, wait for the YouTube login window to appear and sign into your account.
YouTube Export Options
Audio recording
Not only can Action! help you record videos from your screen, but it also captures audio data played on your system. To enter the audio recording mode, all you have to do is click on the "speaker" icon in the menu bar and provide the desired output settings.
Audio Recording
As you can see in the image above, you can only save your audio recordings as WAV or MP4 audio files, and you can select if you want to record silence or not by checking the "Record silence" box. Just like with video recordings, you are given the possibility to record sounds for any desired period of time with the help of the "Duration" feature or choose to capture data from your microphone.
Capture screenshot
Even if Action! is focused on creating video recordings, it can also help you capture screenshots of your entire desktop. To do that, you will have to click the small camera icon from the menu bar and choose the desired format in which your images will be saved (BMP, PNG or JPEG).
Screenshot
Even if this application doesn't offer you more options for capturing screenshots, remember that its main purpose is recording videos of your screen activity.
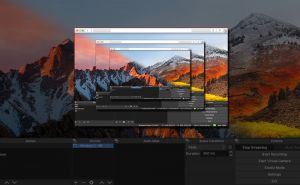
Live streaming
Beside capturing videos, sounds and images from your computer, Action! also provides you with a feature that will allow you to stream your gaming sessions or desktop activities, along with your webcam, to Twitch.tv, YouTube, Aliez.tv, Livestream, Hitbox or Ustream.tv.
Live Streaming Option
In order to do that, select the "Action! LIVE Streaming" tab and click on the "Enable Action! LIVE Streaming" box. Once you have done that, head over to the "settings" window by clicking on the second icon, next to the information tab, select the desired streaming platform and provide your streamkey to start the live stream. Now you can enter your game or application and start broadcasting your activity over the Internet so that other users can enjoy it.
Other features
Beside the already mentioned features that Action! puts at your disposal, there are also several other things that this program can help you do.
Remotely control PC
For example, if you want to remotely access your PC using Android devices or another computer, then simply click on the "Remote Action!" tab and enable the option. You will also have to log into your Mirillis account and set up the authorized devices so that you won't have the surprise of someone else accessing your system. After doing this, you will be able to access all of your Windows applications, play games installed on your computer, watch videos or stream directly from your Android device or a remote computer.
Remote Action!
Benchmark recording
Additionally, you can use Action! to benchmark your gaming sessions or other application recordings. Simply put, this feature will keep track of your frame-per-second (FPS) count and your average frame rate while playing games (or using desktop applications) and export all of these results as a CSV file.
Benchmarking
To activate it, simply select the tab with a clock icon, set the duration for the benchmarking process and click on the blue button to start. After the duration time ends, a CSV file will be automatically generated which you can quickly access either by double clicking on the thumbnail to the left or by accessing the output folder.
Conclusion
As you can see, Action! provides you with a great number of features that will help you record anything form your screen or webcam, as well as live stream content, take screenshots, remotely control your computer or keep track of your FPS count while playing your favourite games. This guide took you only on a basic tour of what this program can do. You can always access the "Settings" menu and change a large number of parameters, like output folder locations, hotkeys, recording options and much more.
If you have any additional questions or comments, feel free to leave me a messages in the section below.


Comments
Subscribe to comments